Recipes From the Momentum Community
...
9 Recipes
Recipes From the Momentum Community
...
9 Recipes
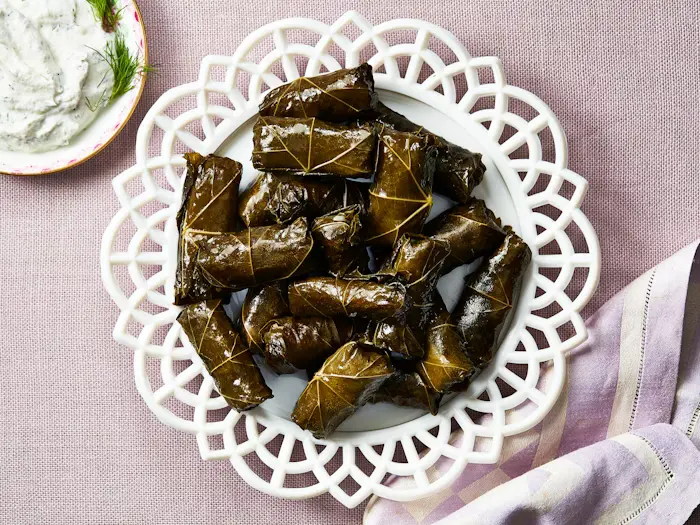
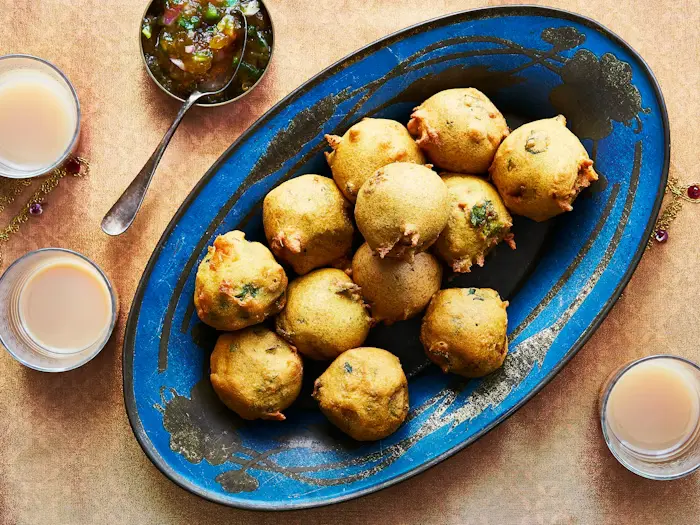
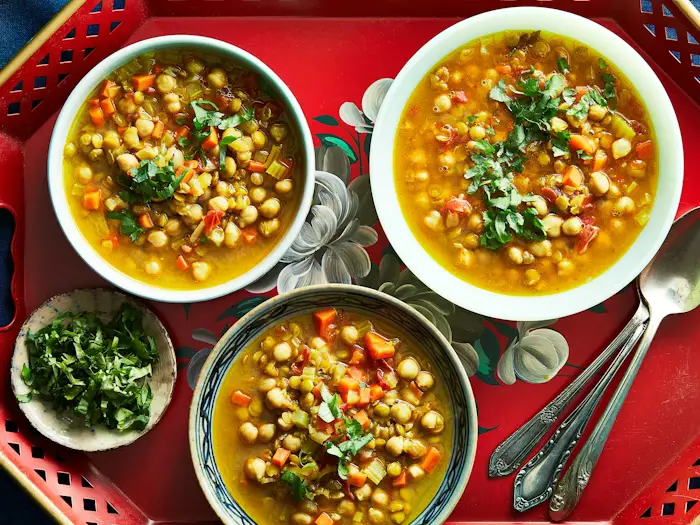
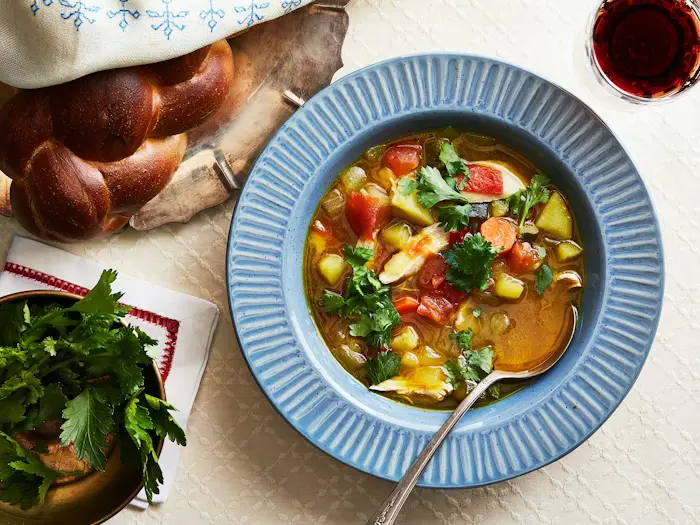
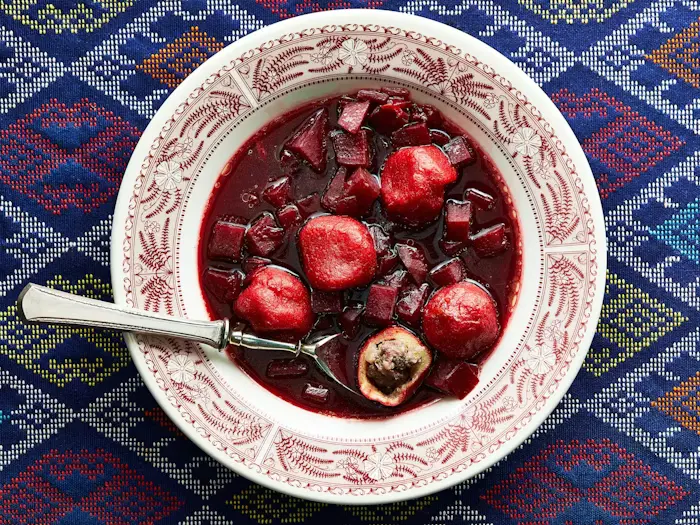
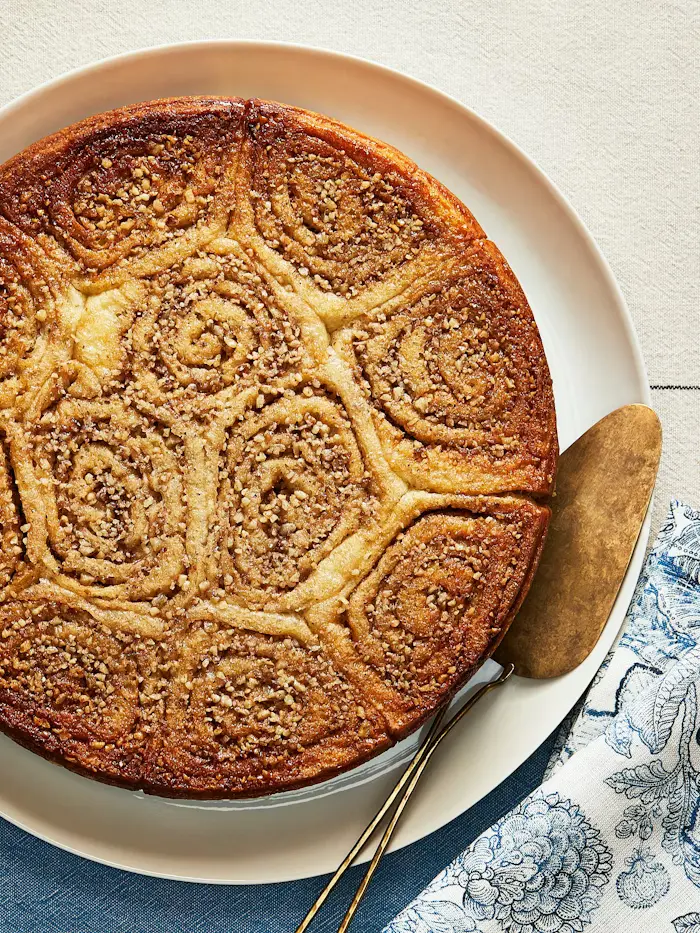
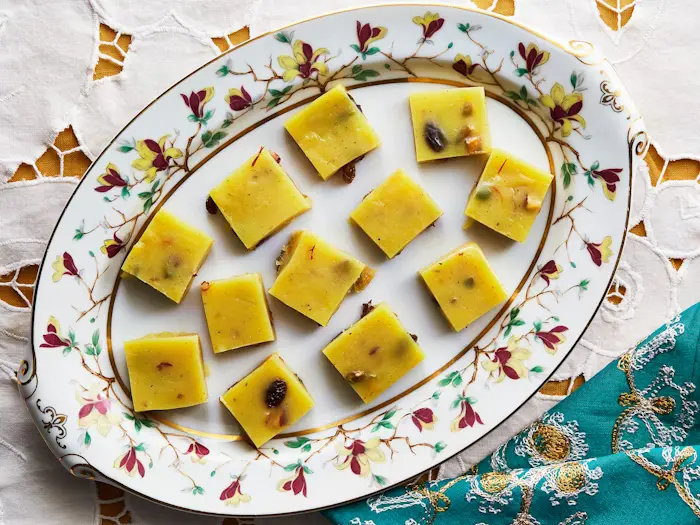
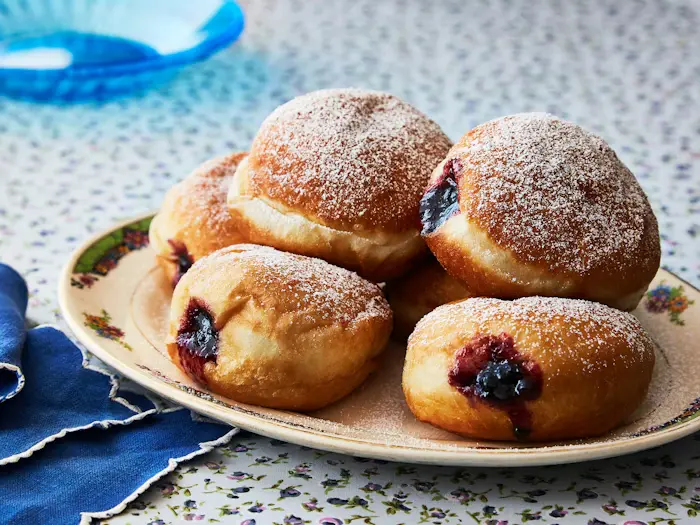
In 2022, Momentum and the Jewish Food Society collaborated to create a cookbook called “Around Our Table: A Celebration of Global Jewish Cuisine, Culture and Community.” Each recipe tells a powerful story and together, they offer a glimpse into the diversity of the global Momentum community. There’s a recipe for golden-hued halwa from Shamira Malekar who grew up in Mumbai and another for Moroccan harira soup that Yael Elfassy makes in her home in Georgia for Yom Kippur break fast. Eva Moremi shared a recipe for a Hungarian sweet from Piri, a woman her mother met during the Holocaust when they were imprisoned in a subcamp of Buchenwald. There is also a recipe for Yemenite soup from Hilla Segev, and many others. A selection of them are featured here.
As JFS board member and chair of the Momentum board Deborah Hochberg, explains in the introduction to the book, “Each delicious recipe tells a story of joy and love, resilience and remembrance — may they inspire you, fuel you, and keep you in good health.”
Recipes in This Collection
1. Dolma (Vegetarian Stuffed Grape Leaves)
Shavuot
2. Batata Vada
Shabbat
3. Moroccan Harira Soup
Yom Kippur
4. Yemenite Soup With Chicken and Hawaij
Shabbat
5. Beet Kubbeh Soup
Cooking Projects
6. Spicy Moroccan Fish
Shabbat
7. Hungarian Wasp Nest (Darázsfészek)
Baking Projects
8. Halwa Made With Coconut Milk and Saffron
Rosh Hashanah
9. Sufganiyot (Filled Hanukkah Doughnuts)
Hanukkah
Shared by Mali Even-Hen
1. Dolma (Vegetarian Stuffed Grape Leaves)
Yield: 60 rollsTime: 2 hours 30 minutesShared by Mali Even-Hen
1. Dolma (Vegetarian Stuffed Grape Leaves)
Yield: 60 rollsTime: 2 hours 30 minutesStuffed grape leaves, often known as dolma, are seen on traditional tables in the Middle East, the Levant, and on the eastern side of the Mediterranean. They can be filled with everything from ground meat to grains. This vegetarian version, shared by Mali Even-Hen, is prepared in the Kurdish Jewish tradition with Persian influences (her mother was born in Iran), and has been passed down for generations. Here, lemony rice and tender herbs are wrapped in brine-packed grape leaves.
“This is a festive dish that is prepared for special events and Shavuot,” Mali notes. The process is labor-intensive, but the recipe makes a large batch, which is ideal for feeding crowds during a holiday. “Because so much work is involved in rolling the leaves, one by one,” explains Mali, those who understand the labor involved in the dish only appreciate it more. “In our family and also among friends people really look forward to this dish — [it] disappears in an instant.”
This recipe comes from a collaboration between Momentum and the Jewish Food Society. Find more recipes from this collection in "Recipes from the Momentum Community," created with the help of Rebecca Firsker and Ame Gilbert.
Ingredients
Grape Leaves
- 1 cups long-grain white rice
- Cold water
- ⅓ cup plus 1 tablespoon olive oil, divided
- 2 tablespoons lemon juice
- 1 tablespoon plus ¼ teaspoon granulated sugar, divided
- ½ teaspoon kosher salt
- Freshly ground black pepper
- 1 medium yellow onion, finely chopped
- 1 cup finely chopped parsley leaves (from about 1 bunch)
- 1 cup finely chopped cilantro leaves (from about 1 bunch)
- 1 cup finely chopped dill fronds (from about 1 bunch)
- 1 bunch (6 to 8) scallions, thinly sliced
- 1 (32-ounce) jar brine-packed grape leaves
Yogurt Sauce
- 1 cup full-fat Greek yogurt
- 1 cup full-fat quark (or cottage cheese, ricotta, or sour cream)
- 1 clove garlic, grated
- 4 to 5 teaspoons finely chopped fresh dill
- Kosher salt
Preparation
Step 1
Make the stuffed grape leaves: Place the rice in a medium bowl, cover with cold water, and soak for 20 minutes. Drain the rice into a sieve and rinse until water runs clear. Place the grape leaves in a large bowl of cold water and soak for a few minutes, then drain to remove some of the salty brine. Repeat, then pat the leaves dry with kitchen or paper towels.
Step 2
Combine ⅓ cup of the oil, lemon juice, 1 tablespoon of the sugar, salt, and pepper in a large bowl and stir to combine. Stir in the drained rice and let this mixture soak for 10 minutes.
Step 3
Stir in the chopped onion, parsley, cilantro, dill, and scallions to the bowl with the rice mixture and let sit for another 10 minutes.
Step 4
Lay a few rinsed grape leaves, vein side up, on a work surface. Remove the stems with kitchen shears or a knife.
Step 5
Place 1 heaping teaspoon of the rice mixture at the base of a grape leaf. Fold the stem end of the leaf over the filling, fold in both sides of the leaf, then roll up (not too tightly) into a cigar. Repeat with the remaining filling and grape leaves.
Step 6
Arrange the filled grape leaves, seam-side down, in a single layer in a large heavy bottom pot, such as a Dutch oven, or wide saucepan with high sides. Arrange a second (or third) layer if needed, placing a pot lid or heat-proof dinner plate on top of each layer to weigh down the one below it.
Step 7
Combine 4 cups of water, the remaining 1 tablespoon of oil, and the remaining ¼ teaspoon sugar in a medium bowl or liquid measuring cup. Pour this mixture over the grape leaves. Bring the mixture to a boil over high heat, then reduce heat to low. Cover the pot and simmer until the rice inside the grape leaves is fully cooked and the leaves are tender, about 60 minutes. (Test this by slicing open and tasting a stuffed grape leaf)
Step 8
Make the yogurt sauce: While the grape leaves cook, combine the yogurt, quark, garlic, and 4 teaspoons dill in a medium bowl. Taste and season with a small pinch of salt and the rest of the dill if desired. Chill until ready to serve.
Step 9
Cool the grape leaves to room temperature. Serve with the yogurt sauce. Store leftovers in an airtight container in the refrigerator for up to 2 days.
Shared by Riki Shai
2. Batata Vada
Yield: 20 frittersTime: 1 H 20 minShared by Riki Shai
2. Batata Vada
Yield: 20 frittersTime: 1 H 20 minWhen Riki Shai’s parents migrated to Israel from Mumbai, they brought their love of Indian flavors and colors, much of which made its way into their recipes. Batata vada, a vegetarian fritter, is a popular street food in the state of Maharashtra, though it’s found in other parts of India as well. In Riki’s family, the potato-based, chickpea flour batter-coated fritters made appearances at childhood Shabbat meals, as well as myriad other happy occasions.
“Making these takes some time but [they are] absolutely worth it,” Riki shared. The original recipe came from her grandmother, and Riki has made some of her own adaptations through the years to arrive at the recipe below. “Vadas are best enjoyed when they are served hot with a spicy green chutney or dry garlic chutney. We also love to have them along with masala chai as an evening snack.” When Riki makes the batata vada, she feels connected to both her Indian and Jewish heritage: “I invite everyone to come and taste and enjoy batata vada and all the Indian dishes that do good to body and soul.”
Read more about Riki’s family in “These Fried Potato Snacks Uphold an Israeli Family’s Indian Roots." This recipe comes from a collaboration between Momentum and the Jewish Food Society. Find more recipes from this collection at "Recipes from the Momentum Community", created with the help of Rebecca Firsker and Ame Gilbert.
Ingredients
- 2 pounds russet potatoes
- Kosher salt
- 1 tablespoon vegetable oil
- 1 small yellow onion, minced
- 2 garlic cloves, chopped
- 1-inch piece ginger, minced
- 1 ½ teaspoons ground turmeric, divided
- Pinch ground cardamom
- Pinch ground coriander
- Freshly ground black pepper
- 1 cup chickpea flour
- 1 egg
- ½ to ¾ cups water
- 1 ½ cups chopped fresh cilantro
Preparation
Step 1
Fill a large saucepan halfway with water. Peel the potatoes, cut into 2-inch chunks and place into the pot. Add more water as needed to cover the potatoes, then salt the water generously.
Step 2
Bring to a boil over medium heat and cook the potatoes until tender, about 15 minutes. Drain the potatoes, then return them to the pot off the heat. While hot, use a fork or potato masher to mash the potatoes until smooth.
Step 3
Heat 1 tablespoon of oil in a large skillet over medium. Saute the onion, garlic, and ginger until the onion is translucent. Stir in 1 teaspoon of the turmeric, cardamom and coriander, then season with salt and pepper. Let cook for 30 seconds until fragrant, then remove from the heat and let cool.
Step 4
Whisk together the chickpea flour, remaining ½ teaspoon turmeric, a pinch of salt, and egg in a medium bowl until smooth. Slowly add ½ cup water until a thick batter forms. If the batter is very thick at this point, add the additional ¼ cup by the tablespoon until it reaches the consistency of thick pancake batter.
Step 5
Line a sheet pan with paper towels. Fill a medium heavy bottom pot, such as a Dutch oven, with 3 inches of oil. Heat the oil over medium until it reaches 365ºF.
Step 6
While the oil is heating, stir the onion mixture and the cilantro into the potatoes until combined. Taste mixture for salt and pepper and adjust to taste. Shape the potato mixture into about 20 golf ball-sized (1 ½-inch) balls.
Step 7
When the oil comes to temperature, working with 4 or 5 balls at a time, dunk the balls into the chickpea flour batter, then gently lift one at a time with tongs or a slotted spoon and let some of the batter drip back into the bowl. Carefully transfer to the hot oil. Adjust the heat as needed to maintain the oil temperature.
Step 8
Fry until the batata vada are golden brown, about 5 minutes per batch, then remove to the prepared sheet pan. Repeat with remaining potatoes and batter. Serve immediately.
Shared by Yael Elfassy
3. Moroccan Harira Soup
Yield: 8-10 servingsTime: 45 minShared by Yael Elfassy
3. Moroccan Harira Soup
Yield: 8-10 servingsTime: 45 minWhen Yael Elfassy thinks of breaking the Yom Kippur fast, she thinks of harira. This hearty Moroccan soup has been a staple on her mother’s side of the family since they lived in Fez. Yael grew up watching her mother make it, who in turn grew up watching her mother make it. Each generation’s version is a bit different, as it’s typically made by intuition, as well as visual and flavor cues, as opposed to strict measurements. So, consider this recipe more of a guideline than a rulebook.
The hearty soup, which can be made with chicken broth or totally vegetarian, gets its heft from chickpeas and lentils. You can start with dried chickpeas if you like, but rinsed ones from a can will do just fine if you’re in a hurry. Don’t skip the dry lentils though: they cook right in the simmering soup in just about 20 minutes.
While harira is wonderful on any cold evening, Yael typically saves it for Yom Kippur break fast. “This recipe to me signifies the start of the new year,” she says. “There is no Yom Kippur without harira.”
This recipe comes from a collaboration between Momentum and the Jewish Food Society. Find more recipes from this collection at "Recipes from the Momentum Community", created with the help of Rebecca Firsker and Ame Gilbert.
Ingredients
- 4 tablespoons olive oil
- 1 medium yellow onion, finely diced
- 2 medium carrots, finely diced
- 2 stalks celery, finely diced
- 2 cloves garlic, finely diced
- 1/2 teaspoon ground turmeric
- 1 teaspoon ground cumin
- 1 teaspoon kosher salt, plus more to taste
- 1/2 teaspoon harissa (optional)
- 1 large tomato, diced
- 1 (15.5-ounce) can chickpeas, drained and rinsed (or 1 cup dry chickpeas, soaked overnight and fully cooked)
- 1 cup green lentils
- 7 cups chicken or vegetable stock
- 1 teaspoon freshly ground black pepper
- 1½ tablespoons all-purpose flour
- 3 tablespoons lemon juice (from about 1 large lemon), plus more to taste
- 1 cup water
- 1 cup chopped fresh cilantro leaves
Preparation
Step 1
Heat the oil in a large saucepan or heavy bottom pot, such as a Dutch oven, over medium heat until it shimmers. Saute the onion, celery and carrots until the onion and celery are translucent and all vegetables are slightly brown, 5 to 10 minutes.
Step 2
Stir in the tumeric, cumin, garlic, 1 teaspoon salt, and harissa if using. Cook for about 30 seconds, until the spices are fragrant, then stir in the tomatoes and stock. Increase the heat as needed to bring the mixture to a boil.
Step 3
Stir in the dry lentils and cooked chickpeas, lower the heat to medium low and simmer until the lentils are tender, about 20 minutes. Season with more salt and pepper to taste and reduce the heat to low.
Step 4
Whisk the flour, lemon juice, and water in a small bowl until the flour is dissolved. Stir into the soup. Simmer for 5 minutes. Add more lemon juice to taste if desired. Serve immediately, with cilantro sprinkled over each serving. Store leftovers in an airtight container in the refrigerator for up to 5 days.
Shared by Hilla Segev
4. Yemenite Soup With Chicken and Hawaij
Yield: 8-10 servingsTime: 1 hour 5 minutesShared by Hilla Segev
4. Yemenite Soup With Chicken and Hawaij
Yield: 8-10 servingsTime: 1 hour 5 minutesFor as long as Hilla Segev can remember, she’s eaten this fragrant Yemenite soup for Shabbat. Known in Israel as marak temani (Hebrew for Yemenite soup), it’s typically made with either chicken or beef, lots of vegetables, and a heady spice blend called hawaij.
When Hilla was young, her family would go to her grandparents’ house on Friday nights to share the Shabbat meal, which started with dishes like a salad of cucumbers, tomato, lettuce, onion, and parsley; fried cauliflower with lemon; and a roasted meat dish Hilla knows as “shawi.” The soup was served as an entree along with lachuch, a Yemenite flatbread, and hilbe, a fenugreek-based paste.
Though her grandmother never wrote down the recipe for her soup, Hilla watched her make it every week. And, when she started cooking for herself as an adult, she made the soup over and over, mimicking what her grandmother did in the kitchen, until it tasted familiar.
The soup gets its most prominent flavor and golden hue from hawaij, (also spelled hawayej and hawayij, among transliterations) a bold spice mix of turmeric, cumin, black pepper, coriander, and cloves. In certain markets, it’s common to see both pre-mixed “soup hawaij” as well as “sweet hawaij,” which contains cloves, cinnamon, nutmeg, cardamon, and ginger. If the packaging doesn’t specify which style it is, inquire about the ingredients list, as the two blends are quite different in flavor.
This recipe comes from a collaboration between Momentum and the Jewish Food Society. Find more recipes from this collection at "Recipes from the Momentum Community", created with the help of Rebecca Firsker and Ame Gilbert.
Ingredients
- 1 (3 ½ to 4 pound) chicken, cut into pieces
- 2 tablespoons olive oil
- Kosher salt
- 2 large Russet or Yukon Gold potatoes, peeled and cut into 1-inch pieces
- 1 large yellow onion, roughly chopped
- 1 large carrot, roughly chopped
- 1 large zucchini, peeled and cut into ½-inch pieces
- 1 large Beefsteak tomato, roughly chopped
- 1 garlic clove
- 1 to 2 teaspoons soup hawaij
- Chopped fresh parsley or cilantro leaves, for serving
- Lachuch (Yemenite flatbread) or another flatbread, for serving
- Hilbe (Yemenite fenugreek paste), for serving
Preparation
Step 1
Heat the oil in a large heavy-bottom pot, such as a Dutch oven, over medium until it shimmers. Working in batches if needed, place the pieces of chicken in a single layer, skin-side down, in the pot. Season the chicken with a few pinches of salt and sear until the chicken skin is deeply golden, 8 to 12 minutes. Flip, season with a few pinches of salt, and cook the other side for 5 to 6 minutes, until the meat easily releases from the pot. (If searing in batches, remove the meat to a sheet pan or large plate and repeat with remaining chicken.) Return all the chicken back into the pot and add enough water to just cover the chicken, (8 to 10 cups) then bring to a boil over high heat.
Step 2
Reduce the heat to a low and simmer for 20 minutes, until the chicken is very tender. Remove the chicken breasts from the pot and place on a cutting board. Continue cooking the rest of the chicken for another 10 minutes, then remove to the cutting board. When the chicken is cool, remove and discard the skin and bones from the meat, then chop or pull the meat into bite-sized pieces. (Alternatively, serve whole, bone-in, skin-on pieces of meat in bowls of soup). Set aside.
Step 3
Stir in the potatoes, onion, carrot, zucchini, tomato, garlic, and 2 teaspoons of salt, then continue cooking until the vegetables are tender, about 15 minutes.
Step 4
Return the pulled or chopped chicken to the pot. Stir in 1 teaspoon hawaij.Taste and add more hawaij and/or salt to taste.
Step 5
Serve immediately. Garnish the soup with parsley or cilantro and serve with lachuch or hilbe if desired. Store the leftovers in an airtight container in the refrigerator for up to 3 days.
Shared by Pnina Shasha
5. Beet Kubbeh Soup
Yield: 8-10Time: 2 hoursShared by Pnina Shasha
5. Beet Kubbeh Soup
Yield: 8-10Time: 2 hoursKubbeh, also known as kibbeh, is a style of dumpling that typically features ground meat wrapped in semolina, bulgar, or rice. Popular in communities across the Levant, kubbeh can be fried in oil, baked, or poached in soup like it is in this recipe from Pnina Shasha. In her Iraqi family, a beef and onion mixture is tucked into a semolina dough and then simmered in a ruby-hued beet broth.
Her grandmother served the dish every Friday for lunch. Today, Pnina continues to make the soup, but not quite as often since kubbeh requires a good amount of time. Over the years, her family’s found a trick to help: once the kubbeh are formed, the dumplings can be frozen for months. “My mom spends hours making hundreds of dumplings and puts them in the freezer, so that they will be ready,” Pnina shares.
Though her grandma’s kubbeh recipe was never formally written down, Pnina learned to make it from her mother and grandmother. To write the recipe below, she made the dish again with her mother, ensuring she recorded each step.
This recipe comes from a collaboration between Momentum and the Jewish Food Society. Find more recipes from this collection at "Recipes from the Momentum Community", created with the help of Rebecca Firsker and Ame Gilbert.
Ingredients
For the kubbeh:
- 1 large yellow onion, very finely chopped
- ¾ pound ground beef
- 1 teaspoon kosher salt
- ½ teaspoon freshly ground black pepper, plus more to taste
- 1 teaspoon baharat
- ¼ cup chopped celery leaves (optional)
- 3 cups fine semolina flour
- 1 ½ cups water, divided
- 1 tablespoon canola oil
For the soup:
- 1 tablespoon canola oil
- 1 large yellow onion, finely chopped
- 3 large beets, peeled and cubed into 1/2-inch pieces (about 4 to 5 cups)
- 3 quarts water
- 1 tablespoon granulated sugar
- 4 teaspoons kosher salt
- Freshly ground black pepper
- 3 tablespoons fresh lemon juice, divide
- Chopped celery leaves (optional)
Preparation
Step 1
Make the kubbeh filling: Place the 1 chopped onion in a clean kitchen towel. Working over the sink or a bowl, squeeze out and discard as much liquid as possible. Place the onions in a large bowl. Add the beef to the large bowl along with the salt, pepper, baharat, and chopped celery leaves, if using. Mix with your hands until combined, then cover the bowl and refrigerate for 30 minutes.
Step 2
Make the kubbeh patties: Mix together 3 cups semolina flour, 1 cup water, 1 teaspoon salt, and 1 tablespoon oil in a medium bowl until smooth. Knead the mixture in the bowl to combine until it forms a dough that is moist but not sticky. If dough feels sticky, knead in additional semolina flour, 1 teaspoon at a time. If dough feels dry, add additional water, 1 teaspoon at a time.
Step 3
Cut dough into two pieces and keep one of them covered. Roll out the other piece of dough on a work surface lightly dusted with semolina flour, or between 2 pieces of wax paper until it is ⅛-inch thick. Cut out about 2 ½-inch rounds and place the cut pieces on a piece of wax paper. Re-roll the scrap and continue cutting rounds until you use up the dough. You can stack the cut rounds between layers of wax paper.
Step 4
Line 1 to 2 sheet pans with parchment paper. Remove the kubbeh filling from the refrigerator. Wetting your hands as needed to prevent the mixture from sticking, pinch off a small piece of the kubbeh filling and gently roll into a 1” ball. Place the ball of kubbeh filling in the center of a rolled out round of dough and pinch to seal the ends. Roll the ball gently in your hands into a ball to ensure the meat is sealed in the dough. Place on the prepared sheet pan. Repeat rolling, filling and shaping until the remaining kubbeh filling and dough have all been used. If planning to cook these kubbeh within 12 hours, place in the refrigerator; if waiting longer, freeze the kubbeh on the sheet pan until solid, about 2 hours, then transfer to an airtight container and freeze until ready to cook.
Step 5
Repeat steps 2 to 4 until all the dough and beef mixture have been used.
Step 6
Make the soup: In a large stockpot, heat 1 tablespoon of oil over medium heat. Saute the 1 chopped onion until translucent, about 4 minutes. Add the beets and saute until softened, about 7 to 8 minutes. Add the water, half of the lemon juice, sugar, salt, pepper, and celery leaves if using, and bring the mixture to a boil. Gently drop the kubbeh into the soup, reduce the heat to low, and cover the pot. Simmer until the kubbeh and the beets are cooked through, about 50 minutes.
Step 7
Season the soup with more salt and pepper to taste. Add remaining lemon juice and serve the soup with a few kubbeh per serving immediately.
Shared by Anna Masica
6. Spicy Moroccan Fish
Yield: 4-5 servingsTime: 50 minShared by Anna Masica
6. Spicy Moroccan Fish
Yield: 4-5 servingsTime: 50 minIn Moroccan, Algerian, Tunisian, and Libyan families, it’s common to prepare a spicy fish recipe for the start of Shabbat. This one comes from Anna Masica’s family and has been made in her Moroccan family for generations. “As my mom used to say, this is a dish that has all the nutrients in it,” Anna told us. She always helped her late mother make the recipe and eventually Anna wrote it down for her own kids when they were old enough to cook for themselves.
Starting as a simple vegetable saute, the mixture is seasoned with paprika, cumin, and turmeric. If you prefer a less spicy version, remove the seeds from the jalapeño before slicing it or skip it entirely and use half a green bell pepper instead. Once the sauce comes together, it’s poured over the fish — Anna uses salmon, but a flaky white fish would also work — then it’s baked until just cooked and served warm.
Every time Anna makes this dish, she feels it brings her closer to her mother, and helps keep her memory alive.
This recipe comes from a collaboration between Momentum and the Jewish Food Society. Find more recipes from this collection at "Recipes from the Momentum Community", created with the help of Rebecca Firsker and Ame Gilbert.
Ingredients
- 5 tablespoons olive oil
- 1 large red bell pepper, thinly sliced
- 1 large jalapeño, thinly sliced and seeded if desired
- 6 garlic cloves, finely chopped
- 2 roma tomatoes, thinly sliced
- 1 lemon, rind and pith removed, thinly sliced into rounds
- 1 bunch cilantro (leaves and all stems), chopped
- ½ teaspoon hot, sweet, or smoked paprika
- ½ teaspoon ground cumin
- ¼ teaspoon ground turmeric
- Kosher salt
- Freshly ground black pepper
- 2 to 3 pounds salmon or white fish like red snapper, striped bass, cod or halibut, skin-on filets
Preparation
Step 1
Preheat the oven to 400ºF. Heat the oil in a large skillet, then saute the peppers until softened, about 4 minutes. Add the garlic and saute for 1 minute. Stir in the tomatoes and lemon, and cook until the vegetables soften, 5 to 7 minutes, then stir in the cilantro. Stir in the paprika, cumin, turmeric, and 1 teaspoon of salt. Remove from the heat.
Step 2
Place the fish, skin side down, in a large glass or ceramic baking dish. Generously salt and pepper the fish, then pour the vegetable mixture over. Cover the baking dish loosely with foil. Bake until the fish is nearly cooked through at its thickest part, and flakes apart when pulled at with a fork on the thinner parts, about 20 minutes.
Step 3
Remove the foil. Turn on the broiler to high and cook for an additional 2 to 4 minutes to char the vegetables. Pull the fish from the oven and let sit for 5 minutes–the residual heat will finish cooking the fish. Serve immediately. Store leftovers in an airtight container in the refrigerator for up to 3 days.
Shared by Eva Moreimi
7. Hungarian Wasp Nest (Darázsfészek)
Yield: 14 servingsTime: 3 H 20 minShared by Eva Moreimi
7. Hungarian Wasp Nest (Darázsfészek)
Yield: 14 servingsTime: 3 H 20 minDuring the Holocaust, Ilona Kellner, known as Ica, was imprisoned at Auschwitz and Hessisch Lichtenau, a munitions factory that was a subcamp of Buchenwald. Like all prisoners, she faced deep hunger, but at night, the women in her barracks would talk about recipes with one another. The act of resistance sustained them.
From August 1944 to the spring of 1945 when Ica was liberated, she wrote down more than 600 recipes, often noting the name of the person who shared the recipe with her. This one came from a woman named Piri who was killed by an SS officer only days before Ica and the surviving women were liberated.
Ica kept her legacy alive by making these buns for her daughter Eva Moreimi, who continues the tradition, baking them every year for Shavuot. The technique used in this recipe is similar to those for cinnamon rolls: a yeasted dough is rolled out into a large rectangle, spread with a buttery filling, rolled up like a jelly-roll, sliced into buns, and baked in one pan. Darázsfészek is made with a walnut filling, but Eva notes it can be made without nuts by simply omitting them and swapping in a splash of vanilla extract.
This recipe was shared by Eva Moreimi. Read more about her family in "The Woman Who Hid 600 Recipes from SS Officers."
This recipe comes from a collaboration between Momentum and the Jewish Food Society. Find more recipes from this collection at "Recipes from the Momentum Community", created with the help of Rebecca Firsker and Ame Gilbert.
Ingredients
- ¾ cup unsalted butter (6 ounces, 1½ sticks), softened, divided
- 1 (¼-ounce) envelope dry active yeast
- 1 ½ cups whole milk, lukewarm, divided
- 3½ cups plus 1 teaspoon all-purpose flour, divided, plus more for rolling out
- ¾ cup plus ½ tsp granulated sugar, divided
- ½ teaspoon kosher salt
- 3 egg yolks
- 1 teaspoon vanilla extract
- 3 cups (12 ounces) ground walnuts or walnut meal
- ½ tsp cinnamon
Preparation
Step 1
Grease a 10-inch round Bundt or springform pan with 2 tablespoons butter.
Step 2
Make the yeast mixture: Whisk together the yeast and ¾ cup milk in a small bowl until dissolved. Stir in 1 teaspoon flour and ½ teaspoon sugar. Cover the bowl and let the yeast activate for 5 to 10 minutes, until foamy air bubbles appear on the surface.
Step 3
Make the dough: Mix the remaining 3 ½ cups flour, egg yolks, vanilla, remaining ¾ cup milk and the rested yeast mixture in a large bowl until it forms a very soft, light dough. Cover and let it proof for 30 to 45 minutes, until the dough has risen slightly (it will not double in size.)
Step 4
Mix the remaining 10 tablespoons softened butter and ¾ cup sugar together in a medium bowl until smooth. In a small bowl, mix together the walnuts and cinnamon. Turn out the tough onto a well-floured surface (it will be very sticky). Roll the dough into approximately a 12- by 18-inch, 1/4-inch-thick rectangle. Spread the butter mixture over the surface of the dough with a spatula, then sprinkle over the walnut mixture.
Step 5
Working from the longer edge, tightly roll the dough into a spiral. Cut into 1½-inch-thick slices. Place each roll into the cake pan, spiral-side up. Repeat with remaining slices of dough in a single layer in the cake pan. If necessary, start a second layer on top of the first. Cover and let rise for 1 to 2 hours, or until the rolls have doubled in size.
Step 6
Preheat the oven to 350ºF.
Step 7
Bake until golden brown, 40 to 50 minutes (rolls will bake longer in a Bundt than a springform pan). Remove from the oven and immediately flip the pan over onto a serving plate. Serve immediately, cutting or breaking apart while the rolls are still warm.
Shared by Shamira Malekar
8. Halwa Made With Coconut Milk and Saffron
Yield: about 75 piecesTime: 3 H 5 minShared by Shamira Malekar

8. Halwa Made With Coconut Milk and Saffron
Yield: about 75 piecesTime: 3 H 5 minThe day and night leading up to Rosh Hashanah were always busy with culinary preparations when Shamira Malekar was growing up in Bombay. A relative sought out the head of a goat that would be served with the hopes that the family would be the head, not the tail in the year to come. And, on some years, a family member would prepare mutton biryani.
Shamira remembers one of her tasks was helping stir chik-cha halwa, a sweet made with coconut and wheat starch, or crystals as Shamira calls them. Women in her family gathered in the kitchen to make it together, starting by soaking the wheat and grinding fresh coconut to make milk. Then they stirred the creamy mixture as it cooked for hours, adding saffron to lend it a golden hue and dried fruit for sweetness. When it was ready, they packed up pieces of halwa along with treats from local markets to share with relatives and friends.
Her mother Ruby, who is 75, remembers the same tradition of cooking halwa with her own mother and aunty when she was little and the family celebrated the holiday in her grandfather’s village Shrivardhan.
It’s a signature of the Bene Israel, India’s largest Jewish community, which according to their traditions descends from one of the lost 10 tribes of Israel who were shipwrecked off the coast of India. Each family’s halwa is slightly different, explains Shamira, but the custom of enjoying it on the holiday is widespread.
Today, she splits her time between Surrey in England and New Jersey. When she visits India, she picks up a bag of chik-cha so she can make the halwa for Rosh Hashanah wherever she is. Since it is hard to source in the U.S., Shamira recommends substituting cornstarch, which is easy to find and takes less time to cook.
We recommend following Shamira’s lead and boxing up portions of halwa for friends and loved ones this holiday season.
Note: Saffron can be quite expensive, and is often sold in very small quantities. We found that as little as ⅛ teaspoon adds a lovely golden color and subtly sweet floral flavor to the halwa, but if you’d prefer a more pronounced color and flavor, add up to ½ teaspoon.
This recipe comes from a collaboration between Momentum and the Jewish Food Society. Find more recipes from this collection at "Recipes from the Momentum Community", created with the help of Rebecca Firsker and Ame Gilbert.
Ingredients
- Cooking spray, oil, margarine, or butter, for greasing cake pans
- 2 ¼ cups cornstarch
- 1 ¼ cups granulated sugar, plus more as needed
- 5 cans (about 8 cups) full-fat coconut milk, (we highly recommend Chaokoh brand)
- ½ cup chopped toasted almonds, pistachios, and/or cashews
- ¼ cup raisins
- ⅛ to ½ teaspoon saffron threads
- ½ teaspoon ground cardamom
- ½ teaspoon ground nutmeg
Preparation
Step 1
Grease 3 8-inch cake pans and set aside.
Step 2
Whisk together the cornstarch and sugar in a medium saucepan until combined, then whisk in the coconut milk. Whisking constantly, heat the mixture over medium until warmed through and the sugar is dissolved, about 10 minutes (the mixture may be a bit lumpy). Stir in the nuts, raisins, saffron, cardamom, nutmeg, and continue cooking, stirring constantly, until the mixture thickens to the consistency of buttercream frosting, about 25 minutes more.
Step 3
Continue cooking the mixture, stirring often, until you start to see bubbles rising from the surface and the mixture starts to turn a bit translucent and solidify, about 10 minutes more. Immediately divide the mixture between the prepared cake pans, pressing gently with the palm of your hand, (or if too hot, lay on a piece of parchment first) to smooth the halwa into the pan.
Step 4
Let cool to room temperature, then transfer to the refrigerator and cool completely, at least 2 hours. Cut each pan into about 24 pieces and serve immediately. Store leftovers in an airtight container in the refrigerator for up to 2 days (the nuts will soften).
Shared by Sivan Kobi
9. Sufganiyot (Filled Hanukkah Doughnuts)
Yield: 18 doughnutsTime: 2 H 50 minShared by Sivan Kobi
9. Sufganiyot (Filled Hanukkah Doughnuts)
Yield: 18 doughnutsTime: 2 H 50 minSivan Kobi’s father was famous in their family’s Los Angeles community for his sufganiyot, jelly-filled doughnuts traditionally made for Hanukkah. Every year before the holiday, Sivan shares her variation on the recipe on her Instagram account Sivan’s Kitchen. She’s tried air-frying and baking the doughnuts, but nothing compares to frying, she says. When it comes to filling, jelly is the most traditional, but Sivan’s also experimented with custard and chocolate, both of which have become popular in more recent years.
Read more about Sivan’s family in “Keeping the Memory of a Father’s L.A. Bakery Alive, One Sufganiya at a Time." This recipe comes from a collaboration between Momentum and the Jewish Food Society. Find more recipes from this collection at "Recipes from the Momentum Community", created with the help of Rebecca Firsker and Ame Gilbert.
Find more Hanukkah recipes in our holiday collection.
Ingredients
- 5 cups all-purpose flour
- ½ cup granulated sugar
- 2 tablespoons dry active yeast
- Pinch kosher salt
- 1 large egg
- 2 cups lukewarm water
- 4 tablespoons (½ stick) margarine, cut into pieces, at room temperature
- Vegetable oil, such as canola
- 2 cups seedless jam, such as strawberry or apricot, or smooth chocolate spread, such as Nutella, for filling
- Powdered sugar, for dusting
Preparation
Step 1
Mix flour, sugar, yeast, and salt in the bowl of a stand mixer fitted with the dough hook on low speed to combine. With the mixer running, pour in the water and the egg, mixing well after each addition. Continue mixing, scraping down the sides of the bowl as needed, until the dough is cohesive but still a bit sticky, about 3 minutes. Add the margarine and mix to fully incorporate it into the dough. Increase the speed to medium and mix until the dough is smooth and elastic, 7 to 9 minutes. Cover the dough with plastic wrap or a clean kitchen towel. Set the dough in a warm place and let rise until doubled in size, about 1 hour.
Step 2
Cut 18 (3- to 4-inch) squares of parchment paper and place on a clean work surface. Once the dough has risen, lightly oil your hands and pinch off 18 balls (each should weigh about 65 grams). Place each ball on a parchment square. Cover the dough balls with a clean kitchen towel and let rise for 25 minutes, until puffy and almost doubled in size.
Step 3
While the doughnuts are rising, line 2 sheet pans with paper towels. Fill a medium or large heavy bottom pot, such as a Dutch oven, with 2 inches of oil. Heat the oil over medium until it reaches 365ºF.
Step 4
Fry the doughnuts: Working in batches of 2 or 3 doughnuts at a time (depending on whether your pot is medium or large), carefully drop the doughnuts on the parchment paper into oil. The parchment will slide off immediately: carefully remove it with a spider or tongs. Adjusting the heat as needed to maintain oil temperature, fry the doughnuts until puffed and golden brown, flipping with a spider or slotted spatula, about 2 minutes per side. Remove the doughnuts to the prepared sheet pans and let cool completely.
Step 5
Use a chopstick or the handle of a wooden spoon to poke a hole (but not all the way through) on the side of each doughnut. Fill a piping bag with the jam or chocolate spread, then fill each doughnut. Place doughnuts on a wire rack placed over a sheet pan and dust with powdered sugar. Serve immediately.